A+ Exam Objective 5.4 Given a scenario, troubleshoot video, projector, and display issues.
To go back to the table of content for Main domain 5.0, click here.
This installment of our A+ study guide covers A+ 220-1101 exam sub-objective 5.4 – “Given a scenario, troubleshoot video, projector, and display issues.”
Common symptoms
Some of the most interesting and challenging problems are related to accurately displaying computer output and images. We will discuss a few of these problems below.
Incorrect data source
The first sign of an incorrect data source is completely illegible output or “No Signal” displayed on the screen. Make sure the correct video format is being sent to the display or projector. Windows Display settings can be used to correct illegible video. Check the resolution and make sure it is within the capabilities of the display. An incorrect setting may be overdriving the output device.
Physical cabling issues
The correct cabling must be used for quality output. For example, an HDMI cable cannot be connected to a device that doesn’t support it. When connecting a computer to a projector or display, the most basic connection will most often be VGA. A three-connector RCA cable, where one connector carries the video and the other two are for right and left audio, may also be seen.
Burned-out bulb
A burned-out bulb is one of the easier issues to diagnose. Turn the unit on and examine all the settings. Note that a projector may have a separate switch for the bulb. If the settings and connections are correct and the fans can be heard spinning, the bulb needs to be replaced.
Fuzzy image
First double check your connections. Fuzziness in a standard display or flat panel may be corrected in Windows Settings. Open Display. Check the Scale and layout settings for an unusual display resolution and adjust if necessary. The recommended resolution will give the best result. If you find the display is still fuzzy choose Advanced scaling settings and turn on “Let Windows try to fix apps so they’re not blurry”. That sounds straightforward enough! Now if you have a projector-related issue, and you just need to properly focus the lens. Historians will recognize the RCA “Indian Head” test pattern. The pattern shown below was used to calibrate early televisions for horizontal, vertical, and sharpness. It was also transmitted by television stations when they signed off for the day. Now a newer Color Bar image is used to calibrate screens. In the newer screen calibration pattern, the SMPTE color bars are shown side by side
 |  |
| RCA Indian Head Test Pattern | SMPTE color bars |
Display burn-in
Burn-in occurs when a static image is displayed for hours and the image eventually burns into the phosphorous layer on the screen. Burn-in has plagued phosphorous CRT monitors and output devices since the RCA “Indian Head” test pattern shown above was introduced in the 1940s. The video game Pong replaced the test pattern as the screen killer of the early 1970s. Burn-in damage on CRTs is permanent.
Burn-in is still an issue for LCD panels, OLEDs, and Plasma screens. In addition since devices such as smartphones and smartwatches use OLED and Plasma technology, burn-in can affect a wide range of users. Fortunately, burn-in can be repaired or reduced in the majority of cases through the use of pixel-shifting techniques and screensavers that display a constantly changing image or color pattern. In addition, apps can wash away any residual images (ghosts) by displaying a bright solid white screen for a specified length of time.
Burn-in can also manifest as pixel degradation where each pixel begins to slowly lose its luminance. However, pixel degradation occurs after thousands of hours of screen time which is often past the lifecycle of the device.
Dead pixels
A TV screen is comprised of thousands of individual pixels that each display a color. Each pixel in the display can produce solid red, solid green, and solid blue colors in any combination and level necessary. However, if a pixel is black and doesn’t display any color, the pixel is considered to be dead and unfortunately cannot be repaired by the user. In some rare cases, dead pixels may resolve themselves but usually, a dead pixel is completely dead. As a technician, a single dead pixel doesn’t require immediate attention unless there are a dozen dead pixels or so within a few square inches. In that case, dead pixels should be taken care of through the device’s warranty.
Flashing screen
First, double-check the connections when a screen is flashing or flickering.
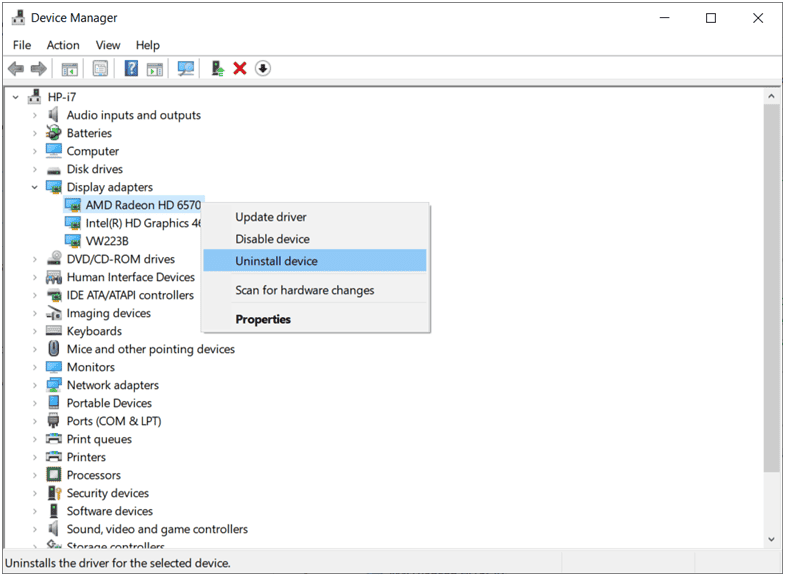
Next, determine if the flashing or flickering is due to the hardware or the software. Launch Task Manager and if Task Manager flickers along with everything else, the most likely culprit is the device driver. In this case, update the device driver for the video adapter. If the problem persists, use Device Manager to uninstall the display adapter. Then reboot the device and Windows will reinstall the display driver, hopefully with the latest driver.
If Task Manager does not flicker while the rest of the screen does, this indicates an app compatibility issue. In this case, uninstall or update the offending app. If the app has been recently installed within the past day or so, the app may have a compatibility issue with the video adapter. Check the display driver and if that does not resolve the problem, uninstall the app and reboot the device.
Incorrect color display
There are several possible causes to investigate when incorrect colors are displayed on the monitor. The color display is a product of many components including the screen resolution, color bit depth, brightness, and contrast. First, the resolution setting controls the number of pixels on the screen. For example, consider a monitor with a recommended resolution of 1920×1080. If the resolution of this monitor is changed to 800×600, the pixels will be consolidated into groups creating an image with less detail.
Otherwise, the remaining display settings can be adjusted through the monitor and the video adapter. The monitor has a push-button menu-driven interface with reasonably good adjustment capability. Next, the video adapter can be calibrated using Windows 11 tools. In the image below, the AMD video adapter software (included with the card) is shown along with some of the available adjustments.

Audio issues
There are a few things to check when there’s an audio issue. Are the speakers properly connected? Is the volume not on mute and set to a reasonable level? Are the balance, bass, and treble set to a level that will not cause distortion?
Dim image
A dim image can occur from poor connections, failing illumination such as a failing LCD backlight, or incorrect settings. Some apps will actually dim the screen to achieve the desired output.
Intermittent projector shutdown
Intermittent projector shutdown is usually heat related. In this case, the projector or the bulb has turned off to prevent overheating which is often indicated by a red on/off indicator LED. A clogged air filter can also force a projector to turn off prematurely in order to prevent damage. Otherwise, the projector may have a standby setting that will kick in during periods of inactivity.
That’s all for 5.4. See you in 5.5!